Followers

Friday 28 December 2018

'Up, Up and Away.'

Good evening Followers, Friends & Visitors,

Hope you have all enjoyed the  Christmas Festivities.   I'm not quite sure where this  year has gone lol!     2019 is nearly upon us,   I wonder what it will bring!     I would like to think it would be Joy,  Good Health and Peace for all.    We shall just have to wait and see lol!

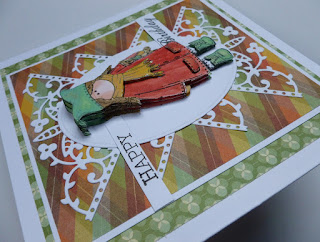
Tonight I would like to share a card with you which I made in October this year.   I was having a sort out of my stamps and came across this happy little fella!   so,  I just had to have a play with him.   He has been in my stash for many years and is a wooden backed stamp called 'Balloon Frog' F-R40 by Funstamps.    Hope you like what I did with it.

      
Make a square base card from linen effect  cream card.   Cut a smaller square of navy blue card and, using the Spellbinder's scalloped oval die cut out an oval from the centre of the navy card, keeping the oval die-cut for another project.   Cut a square the same size as the navy card and colour with the broken china  distress oxide and water.  

     
When dry, stamp the frog and balloon onto it, using a black ink pad.   Stamp Happy Birthday just above the frog's head, once again in black ink.

   
Fix this behind the navy card, so the frog and greeting shows through the oval aperture.    (His legs, hand and balloon will be covered by the navy card,  this does not matter as we will be  adding a 3D frog on top of the original image).

Stamp the frog a further 5 times onto some spare white card.   Colour the images with the Promarker alcohol pens, then cut them out.   Glue 1 whole image to the original stamped image,   (the frog's leg, feet, hand and balloon will now be just outside the oval  aperture).  

   
3D the other images on top, using silicone glue or sticky foam pads.


Die-cut 2 large, 2 medium and 2 small buttons from light blue card, using the Marianne Design die set.


Glue 3 to the top left corner.
       
Glue 3 to the bottom right corner.   Fix this to the base card and voile, the card is finished.

That's all from me for the moment my friends.   All that remains is for me to wish you all a Healthy, Happy and Peaceful 2019 wherever you are.    Hope it is a good one for us all.

                                                             Love and rainbows,

                                                              Hugs   Jennifer xx.


Wednesday 19 December 2018

You're a Star, Happy Birthday.

Good afternoon All,

Hope this finds you all well.   How are your Festive plans coming along,  My cards are all in the post,  decorations up and  my presents all wrapped up I'm pleased to say,  just last minute food shopping to do!   phew!

Thank you so much for visiting my last post and leaving such lovely comments, as you know, I appreciate each and every one.    I love to share my projects with you all and it is so nice to receive some feedback.   Thanks for taking the time to read my blog.   O.k. this afternoon I have a card to share with you which I made in November this year.   A few posts back, I posted a card made with a Sugar Nellie stamp of a little girl, well here is her  little brother lol!    made with another stamp from a few years ago, again a Sugar Nellie stamp.     I just love these cute images...this one reminds me so much of our dear grandson when he was very young, he had a hat just like this one lol!   so cute!

  
Make a square base card from white cardstock.   Onto this, matt a smaller square of red card.   Take a smaller square of white card and glue some patterned papers onto it,  I used We R Memory Keepers papers which, if I remember correctly,  were given free with a craft magazine some time  ago and just seemed to be perfect for this image.   Matt and layer this onto the base card.

Glue some pieces of  patterned paper onto two strips of white card, trim and glue one to the left side and the other to the right side of the card.

 
Die-cut an oval from some white card and cut out an oval shape from  the yellow patterned paper, I drew around the inside of the oval die and I then cut it out and glued it to the centre of the white die-cut oval.

Stamp the boy twice onto a piece of white card, colour him with the Marvy le Plume  watercolour pens, cut them out and then 3D them onto the oval, using silicone glue or sticky foam pads.

   
Stamp 'You're a Star' and 'Happy Birthday' onto white card using a black inkpad.   Trim and glue to the base card.


Colour a small punched heart with some deep red paint adding a couple of touches of Bright Gold Starlight paint and glue onto the base card.


  Glue a gold star onto the top right strip.

Die-cut three different sized buttons, using the Marianne Design button dies from red card.   Thread some twine through the button holes and tie into bows.

  
Glue these down the top left-hand side of the card, using silicone glue.

    
Well, that's all from me for the moment my friends, hope you like him.   Take good care of yourselves, until next time.    Hope to be back soon.
   
                                                                Love and rainbows,

                                                         Big crafty Hugs   Jennifer xx.


Wednesday 12 December 2018

'Santa's on His Way!'

Good evening All,

Thank you for all your lovely comments and your visits on my last post , I really appreciate them and I do enjoy reading your thoughts on my creations.    I also like to see your creations and comment on them.

Hope this finds you all well, for those who are feeling under the weather,    I send warm wishes and hope you feel better very soon.    Most of my Christmas cards are now in the post, I have to admit to buying my cards this year and not hand making them!    shame on me lol!  ah well, maybe next year lol!

Tonight I have a card to share with you, made using a beautiful Imagination Craft's Santa stamp.   I just adore this image and  their snowflake stamp and Silver Just Pearls.    hope you like it.   These Imagination Craft's products can be purchased from the Crafters Companion  website.


Matt a square of blue card onto a white 7" square base card, leaving a small white border showing.
Take a piece of white paper and stamp  Santa, using a well used black, or a  grey inkpad, as we don't want a stark black image but a more subtle image.

  
Cut this down and fix to the blue card, using double sided sticky tape.

Take some white card and colour it with the Milled Lavender and Tumbled glass Distress Inks.   Stamp some snowflakes on top of the coloured card, using the Tumbled glass D.I.


Stamp Merry Christmas on the bottom of the blue matt, using a black inkpad. 

   
Make sure the ink is dry, then stamp some snowflakes using a Versmark pad in a few places, then heat emboss with silver embossing powder.

   
Cut this card down the centre and shape the inside edges of the card using a pair of scissors.   Fix the narrower piece to the left and the wider piece to the right-hand side of the base card, using sticky foam pads, raising these a little above the Santa image.

     
Add three dots of silver Just Pearls to the top and bottom of the Santa image and the dot on the letter i in the word Christmas.


Die cut five snowflakes from white card, using the Tattered Lace dies and glue them to the card front.


      That's it from me for the moment dear friends.   Thanks again for stopping by my blog,  I appreciate the time you have taken, especially at this busy time of year.   Take care of yourselves and  will be back fairly soon.

                                                                 Love and rainbows,,

                                                              Crafty Hugs   Jennifer xx.


Tuesday 4 December 2018

'Make a Splash !!! '

Good afternoon Followers, Friends and Visitors,

Hope everyone is managing to keep warm, wow! the weather here is bitterly cold, woke up to a thick coating of frost this morning.....Jack Frost had a very busy night lol!!

Thank you so much for your lovely comments on my last post.   I really like to know just what you think of my creations...good or bad lol!   your comments mean a great deal to me, so thanks again for the encouragement, makes me want to get started straightaway on my next project!

My card today was made using a  stamp and die set which was given free with the Papercraft Essentials Craft magazine - issue 158.    This set also included a cute duck and a pair of wellingtons.   I did make a card using them a few weeks ago and is on my blog.   Below is the card made using the three little froggies, hope you like this one.

        
Make a square white base card and matt and layer a smaller square of the dark navy card onto it.   Cut a smaller square of white card and colour it with the Ultramarine and Turquoise  Brusho paints and water.

Using the reeds stamp from the set and a black ink pad, stamp the reeds approximately a third of the way up the coloured card.


Stamp the frog  four times onto a spare  piece of white card and colour with Promarker pens.  Glue three of the frogs to the coloured card, using silicone glue.   Cut only the top half of the fourth frog and glue to the middle frog, again using silicone glue.

Stamp the two sentiments to the top of the card using a black ink pad.


Stamp the word 'Ribbet' three times in black ink onto white card, cut out and glue one above each frog.

Colour some white card with the Hibiscus and Jade Starlight paints and from this, die-cut 3 puddles and nine water droplets,  using the dies from the set.

   
Glue these to the card front, fixing the puddles to the bottom of the card, adding a few splashes to each frog.


Fix this coloured card to the base card using double sided sticky tape and the card is finished.

Well, that's me for the moment.   Hope your preparations for Christmas are coming along nicely.   I am, as usual, behind !!  but I usually get there in the end lol!    Stay warm and snug and I'll be back again soon.

                                                            Love and rainbows,

                                                        Crafty Hugs,  Jennifer xx.


Thursday 29 November 2018

Warm Birthday Wishes.

Hello, there, how are you all today?  well I hope.    Thank you for your kind comments on my last post, much appreciated.     Today I have a card to share with you which I have made, using a stamp I came across whilst tidying my craft room and just had to have a play with it.   If I remember correctly, I think this was a Sugar Nellie stamp.   Hope you like it, I just love her cute little hat, out grandson had a hat just like this one when he was small.


Make a square base card using white cardstock.   Matt the green patterned paper (which was given free with the Simply Cards & Papercrafts magazine and is a We R Memory Keeper's pad, (along with the red patterned paper), onto the base card, leaving a border of white showing.

Matt and layer a square of white card onto the green paper, then the multi coloured paper onto the white card.

Using the Intricut Flourishes corner die set,  die-cut four corners from spare white card and glue them down the centre of the card.  
    
   
Die-cut a white oval and glue to the centre of the  base card.   Stamp the girl four times onto spare white card, using a black ink pad.   Colour these images with the Marvy le Plume pens.   Cut them out and 3D them, using silicone glue.

   
Glue her to the centre of the  oval.     Stamp 'Happy' & 'Birthday' onto spare white card, using a black ink pad, trim to shape and glue the 'Happy' to the top left and 'Birthday' to the bottom right of the oval.  


The card is now finished, hope you like her, I just think she is such a cute image.

     
That's all from me for the moment, stay warm and safe in this wet, windy weather.

                                                              Love & rainbows,

                                                              Hugs   Jennifer xx.


Sunday 25 November 2018

Get Well Soon.

Hi there Lovelies,

Happy Sunday,   thank you for stopping by my last post and for your lovely comments, much appreciated.    A dull dreary, damp day here today, mustn't grumble though, as it is almost December.   Hate these  nights when it gets dark so early lol!   another 3/4 weeks and they will start to lengthen once again thank goodness.

Today I would like to share another of my cards with you.   Whilst tidying my boxes of  stamps, I came across this one which I had forgotten about.   It is really a stamp, which when cut out, can be made into a box.   This flower design is from the centre of what would be the box.   I have this stamp in two sizes, this is the larger stamp.  It is quite old now and is a Creative Expression's wooden stamp.   I have tried to keep this card quite simple and not too fussy but as you probably know by now,  I'm not very good at leaving white space lol!    Ok, enough chit chat from me, let's begin this step by step.

   
Begin by making a square base card from white cardstock.   Die-cut four corners from white cardstock, using the Tonic die.   Glue one in each corner of the base card, approximately half an inch in from the card edge.


Cut a white square 2" x 2" and edge with a dark green Promarker pen, then glue this to the cenre of the base card.

Stamp 'Get Well Soon' in black ink around the outside edge of the square.

   
Stamp the flowers from the centre of the box stamp onto some spare white card and repeat again.   Trim the edges.   Colour these with the Promarker pens, then cut out and 3D the flowers and leaves onto the original image on the white square, using silicone glue.

      
Glue this to the green edged square and the card is finished, quite a quick card to make.


Thanks for stopping by my blog, hope you have enjoyed your visit.   Until my next post, be happy and take care of yourselves.

                                                              Love and rainbows,

                                                         Crafty Hugs,  Jennifer xx.


Wednesday 21 November 2018

By the Pond.

Hello Lovelies,

How are you all today, well I hope.   Sending  some hugs to you  if you are not feeling too well and I hope you will soon feel much better.   Boy has it  turned colder today!  a very cold wind, needed my scarf and gloves on today whilst out shopping.

Thank you once again for your lovely comments and visits to my last post.   Tonight I have a card for you which I made using free stamps from various craft magazines.   I have also used Imagination Craft's Rich Gold Starlight paint to create highlights on the dragonflies and flower centre.   The flower die is a Spellbinder's Shapeability die which I have had in my craft stash for some time.   The Starlight paint can be purchased from Imagination Crafts on the Crafter's Companion website.

   
Make a square blue base card.   Take a smaller piece of white card and stamp some bulrushes across the card, using a black inkpad.   Matt and layer this onto the blue base card.

Die-cut an oval from white cardstock and colour the oval with the Weathered wood Distress ink and a blender tool, leaving the centre white.

Stamp some bulrushes onto the oval using a black inkpad.   Glue this to the centre of the white card.

 
Stamp the dragonfly three times in black ink onto some spare white card.   Colour them with watered down Hibiscus and  Rich Gold Starlight paints.


When dry, cut out and glue them to the oval using silicone glue.   Glue the oval to the white card, using silicone glue.

 
Glue three star gems to the top left and bottom right corners of the white card.


Stamp Happy Birthday to the bottom of the blue base card, using a black inkpad.

Die-cut two flowers using the Spellbinder's die from white card.   Colour the petals and centre with a little Bundled Sage Distress ink.   Glue one on top of the other.


Add some 'Just Pearls' pearl to the centre of the flower,  then dot around the outer edge of the  just pearls with the Rich Gold Starlight paint.

   
Glue the flower to the bottom left of the blue base card.

  
Well that's all for the moment my Friends.   Enjoy the rest of your week and I will be back again soon.   Thanks again for visiting my blog, hope you enjoy your visit.

                                                              Love and rainbows,

                                                          Crafty Hugs    Jennifer xx.