Followers

Thursday 29 June 2017

My Canvas - You're a Star Dad.

Hello there,

Hope you've all had better weather than we have had today !  it rained all night and all day today.   The  gardens did need it, just not so much lol!    Hope you are all well and if you're not, I'm sending you some (((Hugs))), hope you felt them.

Tonight I would like to share another of my canvases, made for Imagination Craft's ODS shows on the 27th. & 28th. June 2017 and was shown.   I used two of their fabulous Mixed Media Art stencils on this canvas,  numbers  AS-466 and MA-22.   I have also used their fabulous Structure Paste - so....creamy and smooth!


Paint the canvas front with black Gesso.   Leave to dry.      Lay the background stencil on top and spread the Structure Paste over the design, using the metal spatula.


When dry, spread some of the gold Fabric Relief Paste over the top in the  odd place.    Next stipple a little silver gold Starlight paint on top, in a few places


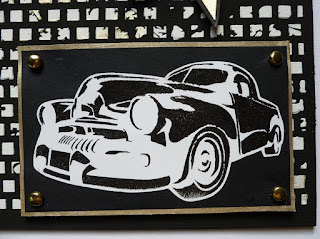
Lay the car stencil onto some white card and stipple the black Starlight Paint through the design, using a stencil brush.     Cut out the car image and matt onto some black card.   Colour a slightly larger piece of white card with the silver gold Starlight paint, around the edges only, as that is all that will be seen, then matt the black card onto the gold edged card.   Punch a hole in each corner and add a gold brad in each hole.   Fix this to the bottom right of canvas with sticky foam pads, adding a little Magi-bond glue to help it adhere to the canvas.

    
Stamp 'DAD' using a  Versamark pad, onto black card and heat emboss with white embossing powder.   Stamp the letters again, cut out and fix to the original images, using sticky foam pads.   Glue 'DAD' to the top left of the canvas.

   
Cut out a star shape and paint with the silver gold Starlight paint, then matt onto a piece of black card.   Trim around the star, leaving a tiny border of the black showing.   Stamp 'You're a star' in the centre of the star, using a black ink pad, then fix to the top right of the canvas
using sticky foam pads.

   
Colour more white card with the silver gold Starlight paint and die cut a rosette using the Spellbinder's  die.   Cut out two pieces of the silver gold card to make the ribbon tails.  


Stamp 'Simply the Best' in the centre of the rosette, using a black ink pad.   Fix the rosette to the bottom left of the canvas.

   
That's this canvas finished.   Thanks so much for visiting my blog, I do appreciate it.     Have a great weekend, hope the sun shines on you all.   See you all again soon.

                                                               Love and rainbows,

                                                                 Hugs   Jennifer xx.


.

Tuesday 27 June 2017

Another Year Flies By Card.

Good eveing Followers, Friends and Visitors,

I'm back again with another card made for Imagination Craft's ODS today and tomorrow 27th. and 28th. June 2017.   The times tomorrow are  9am.  1pm.  and 5pm.  hope you can tune in.

My card tonight was shown on the launch show tonight and I have used  the fabulous new Fabric Relief Paste.   The colours are just stunning and they can be used on material which can then be machine washed, so get out those T shirts in the bottom of the drawer and give them a new look with this fab paste and one of Imagination's Mixed Media stencils lol!!

   
Using some black shiny card, lay the butterflies stencil onto it.   Mask down the edges to stop the stencil moving, then using a metal spatula, spread the red  Fabric  Relief Paste over four of the butterflies, stars and dots.   Remove the stencil and leave the images to dry.   When dry, cut out the butterflies, six stars, three large dots and punch  out four small  black dots.


Stamp  'another year flies by' in the top right, using a black ink pad and heat emboss with black embossing powder

   
Stamp 'Happy Birthday' in the bottom left corner, again in black ink pad and heat emboss with black embossing powder.

   
Die-cut two corner bows from black shiny card, using the Memory Box die  and glue one on the left and one on the right side of the base card.


Glue the butterflies in  a group in the centre  of the base card.   Glue the dots and stars at either side of the butterflies, turning two of the stars over to the black side,  to give a little contrast and blend in with the larger butterflies.

     
                                    Add some silicone glue under the wings of the butterflies.


Thank you so much for visiting my blog,  I do hope you have enjoyed your visit and hopefully,  I have inspired you to 'have a go.'     I will be back soon with another post, so see you then.

                                                               Love and rainbows,
    
                                                          Crafty Hugs   Jennifer xx.


Monday 26 June 2017

'My Perfume Bottle' Canvas - a 'Sneaky Peek.'

Hi there Everyone,

It's me back again with another sneaky peek at one of my canvases, made for Imagination Craft's ODS shows on the Hochanda T.V. Channel on the 27th. & 28th. June 2017.   Hope you will be able to tune in as Sue will be launching an amazing new product, which can be used on various surfaces.   I just love these !!!     I have used them on my canvas  I am sharing with you tonight.    The colours are just stunning, especially when the light catches them.   O.K.let's get started.

  
Paint the front of the canvas with black gesso.   The perfume bottle was added to the left-hand side of the canvas, using Arctic White Sparkle Medium and the metal spatula.

  
When dry, add the chain, using the Gold Relief Metallic Paste and the spatula.   Next add the flourish, again using the gold Relief paste.


Add 'Love' to the top right, using the gold Relief Paste.


Lay the charm and heart onto some black card and add the gold Relief paste through the stencil, leave to dry.   Cut out charm and add to the chain and  hang the heart from the letter  'O.'


Colour some black card with the red Relief Paste.   Leave to dry, then die-cut two lilies from it using the Crafter's Companion die set.   Die-cut one lily from white card and colour slightly with the red Relief paste.   When dry, draw some markings on the petals, using a black fine liner pen.

  
Put the flowers together and glue on top of the flourish, adding the stamen to the centres (die-cut from black card and rolled up, as in quilling).   Add some silver gold Starlight paint to the tips of the stamen.

   
Colour some black card with the green Relief Paste, leave to dry, then die-cut the leaves (using the die from the lily set)  and glue between the flowers.


Colour some black card with the blue Relief Paste and when dry, punch out five tiny flowers and glue in between the lilies, adding tiny black gems to the centres.

 
Lay the ribbon from the stencil onto some black card and spread the red Relief Paste through the design.   When dry, cut out the bow and glue to the bottle top, using silicone glue.

Well that's it finished, hope you like it.   Thank you so...much for stopping by my blog, hope you have found some inspiration for your projects.   See you all again soon.

                                                        
                                                             Love and rainbows,

                                                              Hugs    Jennifer xx.


Sunday 25 June 2017

Flower Burst Card - 'Sneaky Peek.'

Hi there Followers, Friends and Visitors,

Hope you have all enjoyed your weekend, we attempted to have a BBQ this afternoon but it was so windy and cold, we ended up inside lol!     We packed up and when we were finished the sun came out and the cold wind dropped !!  just our luck!

Well onto tonight's post,  a 'sneaky peek' at one of my cards made for Imagination Craft's ODS shows on Hochanda T.V.   Sue will be launching a fabulous new product which can be used on card, material etc., very exciting!   The show launch will be @ 6pm.on Tuesday 27th.June and  @ 8pm. and on Wednesday 27th. June @ 9am.  1pm. and   5pm.   I do hope you can tune in.


Lay the Art Stencil no. MU-42 onto a piece of navy blue card and stipple the Jade and Rich gold Starlight paints through the design, using an Imagination Craft's large stencil brush.

Trim this into a rectangle to fit down the left-hand side of the  7"x7" white base card and put to one side for the moment.

  
Flip the stencil over and lay onto a piece of navy blue card and stipple the Jade and a light touch of  Rich gold Starlight paints through the large flower only.   Cut this out and fix to the back of the rectangle, making a whole flower.   Leave a narrow border of the white base card showing at the top, bottom and down the left-hand edge.

 
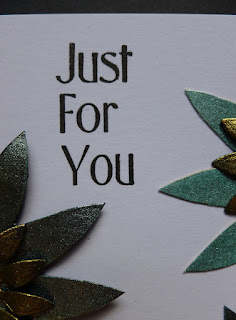
Stamp 'Just for you' in black ink at the top of the white base card and 'Wishing you a speedy recovery' at the bottom.

   
Make more flowers using the stencil and the Jade and Gold  Starlight paints.   Cut out, cutting various sizes.   (I cut out three part flowers for this card).   Glue them in position.


Die-cut three flowers using the Spellbinder's die and paint with the Rich gold Starlight paint.   Glue one whole flower to the large flower and cut up the others to fit the half flowers and glue in position.

 
Well that's all from me for the moment, I will be back with one of my canvases very soon.   Have a good week.    Cheerio for now.

                                                               Love and rainbows,

                                                                Hugs   Jennifer xx.


Wednesday 21 June 2017

Evening Sunset Tag.

Hello Everyone,

Thank you for your comments on my last tag, I do appreciate them.   We have had one quick, heavy shower of rain today along with a couple of rumbles of thunder.    It has been so....warm today, I do
hope it cools down a little tomorrow, at least we have managed to get all the outside jobs done that needed to be done, before the rain arrives lol!

I went out this afternoon to post my latest samples to Sue & Harvey of Imagination Crafts, for their next show at the beginning of next week.   On arriving back home, the doorbell rang and it was a carrier with some 'happy post' from Sue and Harvey lol!  it has happened before where I post  my samples to Sue and her parcel arrives the same day, crossing in the post !!   telepathy or what lol!  ha ha!    Only 7 days to get these samples ready, so I know what I'm doing tomorrow lol!

Well onto tonight's tag.   This is a fairly quick tag to make and needs few products to make it.

   
Cut out a large tag from white card and paint the outside edges with the blue Starlight paint.   Put this aside for later.

Cut out a smaller white tag and brayer the Hibiscus, Canary yellow and  Orange Oxidized onto it,  brayering across the tag and blending the colours together.

   
Cut out a circle from white card and colour with the Starlight paints (but not the blue).   Glue this to the tag when dry.   Lay the bulrushes panel stencil on top and spread the Teal Sparkle Medium over the design, using the metal spatula.   Remove the stencil and leave the image to dry.

    
Glue this smaller tag to the larger one with double sided sticky tape and Imagination Craft's Magi-Bond glue.   (I find this works better on card painted with Starlight paints plus, you then get a little 'wriggle room' to get the tag in the correct position before it sticks permanently).  

   
Paint a small piece of cream satin ribbon with the Starlight paints and when dry, punch a hole in the top of the tag and thread the ribbon through the hole.   The last thing to do if you wish, is to make a stand and glue to the back of the tag, so it can be stood up.

That's all from me tonight, hope you have enjoyed your visit to my blog.   Enjoy the rest of your week, see you all again soon,  so I will say cheerio for now.

                                                                Love and rainbows,

                                                                 Hugs   Jennifer xx.   


Monday 19 June 2017

Love Birds Tag.

Hi there Followers, Friends and Visitors,

Another beautiful day here today.   Hubby cut two of our lawns and I cut the other.   It was still wet with a heavy dew and I had to cut it twice!!  as the machine was not picking the grass cuttings up lol!  never mind, it was good exercise !!   Spent some time this afternoon in my craft room making samples for Sue & Harvey's next ODS shows coming up very soon.   I thought It was time to share another tag with you all tonight,  made for my challenge which Sue set me a while back.  

 
Cut out a large tag shape from white card and a slightly smaller one, again from white card.

Take the small tag and colour with the Peeled paint and  Broken china Distress Inks.   Lay the ivy leaf panel stencil onto the tag and rub the Peeled paint Distress ink through the design, using a piece of cut 'n' dry foam, then remove the stencil.

 
When dry, lay the birdcage stencil onto the tag and spread the Light Copper Sparkle Medium over the design, using the metal spatula.   Remove the stencil and leave the image to dry.

    
Die-cut two of the doily lattice's using white card and the Crafter's Companion Edgeable die.   Lift up the flower petals.   Colour the edges of the die-cuts with the  Apple Green and Sky Starlight Waxes and the flower petals with the  blue.

  
Cover the lattice with the Copper Sparkle Medium, I used my finger to do this.   When dry, glue the lattice die-cuts to the back of the tag, using double-sided sticky tape, then matt this onto the larger white tag.   Glue a blue gemstone to the centre of each small flower.


Punch a hole in the top of the tag using a Cropodile and then set in an copper  eyelet, again  using the Cropodile.    This amazing little hand held machine, cuts through card, tin etc., just like butter and makes the setting of eyelets so easy.

 
Thread some narrow green ribbon through the hole and glue a ribbon bow to the bottom right.    Make a stand and fix to the back of the tag, so the tag can be stood up.

That's it for the moment, I will be back soon with another tag.   I will of course be showing a few 'sneaky peeks' at some of  my samples made for Imagination Craft's One Day Special shows on the Hochanda T.V. Channel coming up very soon.   I will let you know the dates and times as soon as I can.   In the meantime, have a good week.

                                                                Love and rainbows,


                                                                 Hugs   Jennifer xx.


Friday 16 June 2017

Happy Birthday Butterflies.

Hello Lovelies,

Well, a lovely warm weekend is in store for most of us.   The lawns badly need cutting again, so we know what we will be doing this weekend lol!!   yep !   cutting the grass.   Hope you are all looking forward to a relaxing time, maybe a BBQ is on the cards lol!

Speaking of cards!   tonight I have one which I made for Imagination Craft's ODS shows on Hochanda T.V. back in April this year.   I used the large butterfly stencil, Mixed media Inks and of course - the fabulous Starlight paints.


Mask off a one inch border, using low tack masking tape, around the edges of an ivory 7"x7" base card.   Spray the Sunshine, Red and Dark brown Mixed Media Spray Inks onto the centre of the base card, gently remove the masking tape  and leave to dry.

  
Stamp the text onto the coloured base card, using a Versamark pad and heat emboss with gold embossing powder.

Lay the butterfly art stencil onto a piece of dark  brown card and stipple the pink sorbet and sand Starlight Paints through the design, using a stencil brush or a piece of cut 'n' dry foam.   Do this with three butterflies of your choice,  (  I chose 1 large, 1 medium & 1 small butterflies).


Cut out each butterfly, leaving a tiny brown border showing around each one.   Glue these in position on the front of the card using Magi-bond glue, adding some silicone glue under each wing to give some dimension to the card.

   
Die-cut an oval, using the Just Rite die, from dark brown card.  Stamp 'Happy Birthday' onto it, using a Versamark pad and heat emboss with gold embossing powder.   Glue this to the bottom right of the base card using a sticky foam pads.

   
The card is now finished.   Hope you like it,  I thought the dark brown card made a change from  the black I usually use to make the images 'pop.'    Have a wonderful weekend and if you like the warm weather (and I know some like me, don't like it too hot lol)  enjoy the sunshine.

I will be back soon.  Take care of yourselves.

                                                                  Love and rainbows,

                                                                    Hugs   Jennifer xx