Followers

Monday 30 December 2013

Flying High

Hi All,

Well it's not long to wait now and we will be into another new year,  2014.    Have  you  something planned for New Year's Eve or you opting to stay indoors and watch the television where it is snug and warm to see the New Year in ?     Whatever you plan to do, I hope you enjoy your evening.

The card I would like to show you this evening was made for Sue and Harvey of Imagination Craft's in April 2011 and uses their 'Birds and Leaves' Stamp Set  from the Stencil Stamp Range.    I also used their Leaf Spray Stencil which is vey pretty.   The colours I chose for this card were turquoise,  silver, dark blue and white.   Well let's get started.

       
Make a base card from white card stock.  Onto this matt some silver mirror card leaving a border of white showing and then matt some turquoise card onto the silver, again leaving a border of the silver showing.   Next matt a piece of dark blue card onto the turquoise card.   Trim another piece of turquoise card smaller than the dark blue and lay the stencil onto it and dab some Versamark through the design.  Remove the stencil and brush with some green, blue and a little silver mica powders.   Remove the excess powder.   Wrap some ribbon along the bottom of this card and secure on the reverse, then fix this to the base card.

      
Take a piece of white card and  using the Spellbinder's Peony Die and  a die cutting machine, cut out and emboss.   Whilst the die is still in place, colour the card with Weathered Wood and Broken China Distress Inks.  Remove die and lay the leaf stencil on it and dab some Versamark as before and dust with th mica powders.   Die cut a slightly larger peony shape and glue the stencilled piece onto it and fix this to the base card using sticky foam pads to give a little dimension to the card.   Make a small narrow strip in the same manner as before using the leaf stencil and mica powders, then glue this along the centre of   the ribbon.    Gather up a small piece of ribbon and glue to the bottom left corner and add a ribbon bow to the centre.  Glue six clear gemstones to the bottom right of the card.

        
Make nine roses varying in size from dark blue card and rub some silver metallic pigment ink onto the tips and heat emboss with silver embossing powder.   Glue them around the bottom and up the right- hand side of the peony die- cut  but on the leaf stem as though they were growing there.


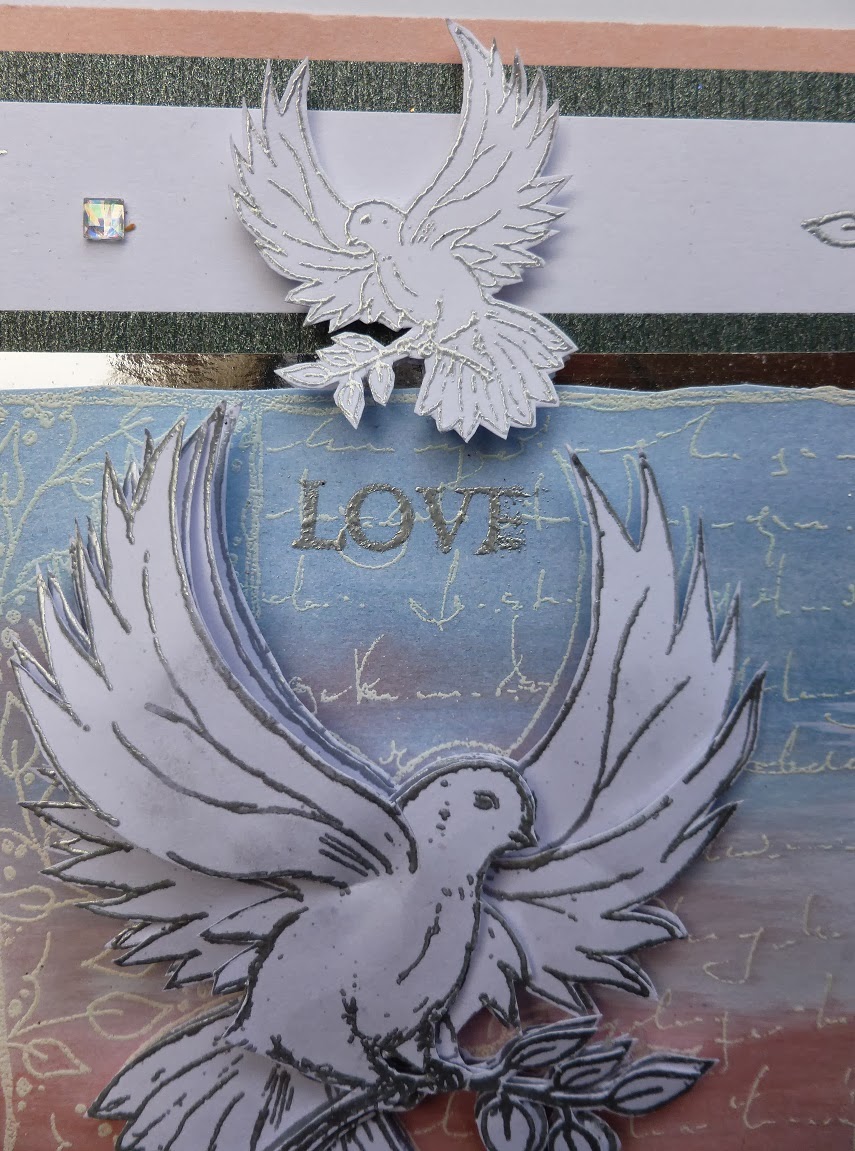
We are nearly there now, just the beautiful bird to make..   Stamp the bird onto a piece of firm white card and fussy cut around it.


Cover the bird with pink, blue and purple pigment inks  and cover with Magi-Boss Chunky -' Diamond Clear Water' embossing powder.  This is a fabulous product and comes in other colours but because I'm using coloured ink pads, I use the clear powder.  Heat this until it softens and whilst the embossing is still hot add more powder and heat again.    Before doing the next layer add some silver embossing powder to the tips of the wings, add more embossing powder  and heat until you achieve a smooth,  glossy effect.    Once dried pop it into the fridge to harden for a little while, then bring it out and twist it slightly until it begins to crack all over but not deep cracks.  This gives quite a nice effect.   The last thing to do is to glue the bird to the centre of the peony die-cut.   That's it finished.   Thank heavens I hear you say !   It is a bit time consuming but I feel well worth it lol.   Take care of yourselves and enjoy your New Year celebrations whatever you are doing.   I'll be back in 2014 with more cards.
                                                                      Crafty Hugs,

                                                                       Jennifer  xx


Friday 27 December 2013

Butterfly Sparkle

Hi Folks,

Hope you've all enjoyed the Christmas festivities.  We have had a couple of days of just chilling out, mind you the weather has been appalling here,  very, very windy and has not stopped raining.   We are counting ourselves lucky that we still have our electricity.      Had a wonderful  family Christmas.   Before we know it it will be 2014 lol and time to party again !!

Tonight's card was Made for Sue and Harvey of Imagination Craft's in September 2012 and uses their fabulous Sparkle Medium and Daisy Dots Embossable.   I really like this combination of Sparkle Medium colours.

    
Make a base card from black card stock.   Matt a piece of cream card onto the black leaving a border of black showing.

Take a piece of white card the same size as the stencil and mix the Ochre Inkadink with some Copper Mica Powder and water.   Mix the Avocado and Aubergine Inkadinks with water and spray all the colours onto the white card until you are happy with the background.   Leave to dry.

Lay the stencil on the now coloured card and using the spatula, spread the Sparkle Mediums over the stencil.
Remove stencil and when dry fix this to the base card.

Cut out the oval from cream card and a smaller one from black card.   Glue the black oval to the centre of the cream oval.   Cut out and emboss the small flowers from black card  and glue to the cream oval.


 Cut out and emboss the leaf stem and glue to the right hand side of the base card.   Colour some white card as before.   Cut out and emboss the two butterflies.    Cover with the Sparkle Mediums.   Glue them to the base card.

Cut out and emboss the Ironworks Border from black card and glue a small piece to the top left and another to the bottom right of the base card.

Well that's it finished folks, have a good evening and thanks for stopping by my blog.   I'll be back soon.

                                                                            Hugs,

                                                                         Jennifer xx    

Tuesday 24 December 2013

Irresistible Irises

Good evening All,

Just a quick post from me tonight as it's nearly Christmas !! yeah.     All little children should be tucked up in bed dreaming of Santa Claus, sleigh bells and Christmas stockings lol.   The one night in the year when they are willing to go to bed early !!

I would like to say welcome to my newest follower Eileen ,  thank you for following me and I hope you enjoy your visits and to my earlier followers,  thank you for your visits and your lovely comments, they make me a very happy bunny lol.     Well on to the card I am featuring in tonight' post.


Make a base card from silver mirror card and matt some black card onto this leaving a border of the silver showing.   Cut a piece of lavender card just slightly smaller than the black and lay the stencil over it.   Using cut n' dry foam, cover stencil design with Versamark.   Remove stencil and brush with silver mica powder.

    
Return the stencil to the card again and cover the small hearts only with the Lavender Sparkle Medium.   When dry matt the lavender card onto the black.

Stamp the irises onto some white card using Versamark and heat emboss with black embossing powder.   Colour the design with mica powders, using a paintbrush and water.

   
Stamp the irises a further three times, cut out the irises and 3D them using silicone glue.   Trim the whole image and fix to the  centre of the lavender card.   Add a bow to the top left of the card.

Well that's it folks, hope you like it.   I would just like to wish you and your families a Wonderful Christmas and a Happy, healthy and prosperous New Year.   Have a lovely time and I'll be back in a few days.

                                                          Love and best wishes to you all,

                                                                    Hugs  Jennifer xx


Friday 20 December 2013

Presents at Christmas

Hi there,  hope everyone is snug and warm, as I sit here I can hear the wind lashing the rain on the windows,  I'm so pleased to be in the house snug and warm in front of the log fire.  Are you all ready for Christmas ?  I just have my cake to ice and I'm finished  !   whoopee.   Well onto tonight's card,  I just love this cute little stamp,  I received it free with a craft magazine.   The stamp is a Holly Hobby Stamp.  The background of this card was made using  Imagination Craft's  Christmas Scrolls Border Stencil,   I love the design of this stencil.  OK on with the card.

       
Make a base card from red card stock.   Cut a piece of white card slightly smaller than the red and lay the stencil on it.   Dab the distress inks through the design, remove the stencil and leave to dry.

Stamp the girl onto some white card four times.   Stamp the girl again in the centre of the stencilled  oval using black ink.   Colour the images using Promarker Pens and cut out.   3D the images onto the image in the centre of the oval using silicone glue.

Wrap some ribbon down the left-hand edge of the white card and secure on the reverse.   Glue this to the red base card.

    
Die-cut a Tattered Lace snowflake using white card.   Rub with  a Versamark Pad and heat emboss with gold embossing powder.   Glue this to the top of the ribbon.   Colour some white card the same as the girl's hat and make one large, one medium and one small flower.   Glue the small flower to a ribbon bow and glue to the top of the ribbon.

   
Die-cut a tag using a Spellbinders tag die, from green card.   Stamp 'Happy Christmas' on the top of the tag and heat emboss with gold embossing powder.  Spread some Imagination Craft's red Sparkle Medium over the top of the tag  and on the bottom of the tag using part of an image from a stencil.   Fix the tag just under the flower.   Glue the medium and the large flowers to the bottom of the oval.

Well that's it guys !   Thanks so much for dropping by my blog, if you're not already a cardmaker, I do hope that this card may have encouraged you to take up this wonderful creative hobby.   See you again soon.

                                                                Love and rainbows,

                                                                  Hugs  Jennifer xx


Tuesday 17 December 2013

Joy at Christmas Time

Good evening  Followers, Friends and Visitors,

Where has this month gone !! not long now before we celebrate Christmas and all it means.  Hope all your preparations are well under way or finished.   I still have one or two things to do such as ice my cake and wrap a couple more presents, then I'll be done !  whoopee, when they are done I'll feel ready to enjoy Christmas,  bring it on !!

I have another Christmas card to share with you tonight which I made for Sue and Harvey of Imagination Crafts in September 2010.  I have  used their beautiful 'Snow Globe' Stamp and is coloured with their  'Inkadinks'   They come in a large variety of colours and last for a long time.   I'm not sure that this stamp is still available as it was made 3 years ago.  So let's begin making the card below.   Hope you like it.

     
Make a base card, landscape style from black card.   Onto this matt some pale green card, just slightly smaller than the black card.   Next matt a piece of  black card onto the green leaving a small border of green showing.

Take a piece of white card just smaller than the black and using the black inkpad, stamp a row of poinsettias along the top and bottom of the white card.   Fix this to the black card.

    
Take a piece of black ribbed card and matt onto the white card.   Next using  a Cricut machine or similar, cut out the letters JOY  three and a half inches high.   Colour with the inkadinks.   Stamp the poinsettia over each letter and paint with the Inkadinks.

Stamp the 'Snow Globe' onto some white card with the black ink pad and colour with the Inkadinks.   Place the 'Snow Globe' behind the letter 'O' then fix the word 'JOY'to the base card.

   
Onto some spare white card, stamp the poinsettias a further 25 times,   paint them with the Inkadinks, cut them out and glue them to the front of the card, fixing 4 of them only to the black and white borders.

Add some glitter glue to the 'Snow Globe' and the flower centres.   Well that's it finished, it does take a little time to cut out the small poinsettias but I feel it is worth it as they add some dimension to the card.

Take care until I return in a few days with another card.   Thank you for taking the time to visit my blog and
leave your comments they mean a lot to me, thank you.

                                                                Love and rainbows,

                                                               Big Hugs   Jennifer xx


Saturday 14 December 2013

Waiting for Santa.

Good evening Followers,Friends and Visitors,

Hope everyone is feeling well,  there seems to be a lot of coughs and colds around at the moment, so hope you all steer clear of those.   Boy has it been  windy here today !  very wet and dull.    Well onto a happier subject - crafting lol!   just the sort of day to do some crafting  with no guilt feelings that I should be out in the garden cutting  down the dead plants  or clearing up the fallen leaves !   Tonight's card was made in June 2012 for Sue and Harvey of Imagination Craft's.   This is just such a cute image of the two owls, I think most people like owls don't they ?  well I certainly like these two lol.   So, let's get cracking ! 

                                       
Make a base card using red cardstock.   Matt some white and then some blue card onto the red base card, each time leaving a small border.

Take a piece of white card approximately  one quarter of an inch smaller than the blue card and matt this onto the blue card.   Put this base card to one side for the moment.

Stamp the main owl image six times onto another piece white card using the black inkpad.   Colour them with Promarker pens cut them out and 3D them.   Fix  the base image onto some blue card and trim around the edges leaving a tiny border of the blue showing.

Stamp the Santa hat ten times, colour them  and cut them out.   Glue one to each corner of the base card.   Stamp the holly scroll and the text onto the white card using a black inkpad., putting the greeting across the bottom.     Colour the holly in using Promarkers.

Make a border using the Santa hats by glueing two hats on the left and four on the right,  alternate the hats ie.,  one up then one down and so on across the centre of the card.   Fix the 3D owls to the left-hand side of the base card on top of the hat border.

Add three red star gemstones to the top right of the card.   That's this card finished.   Thank you so much for visiting my blog,  I do hope you will visit again soon.

                                                                Love and rainbows,

                                                                      Jennifer xx


Thursday 12 December 2013

Snowy Mountain Sunset

Hi All,

An early post from me today for a change.   Once our beautiful Grandson arrives home from school  the peace and quiet  is in short supply lol   but we don't mind that in fact we love it!   so I thought I'd get it done early today.   This card I made for Sue and Harvey of Imagination Crafts in October 2010 and as you have probably  noticed from my previous cards,  I just adore cards with deer on, so having said that,  here's another one !   

  
Make a white card  landscape style and onto this matt a piece of black card, leaving a border of white showing.   Next take a piece of white card and trim to size, just smaller than the black card,   colour it with the Inkadinks and some cut n' dry foam.   When dry, ink up the roller stamp with black ink and roll across the centre of the coloured card.   Punch out a 1" circle from each corner and matt this onto the black card. 

Colour a small piece of white card to look like a sunset ie.,  Ochre, Coco and Cherry Pie Inkadinks.   Take one of the punched out circles and add some Cherry Pink Inkadink to it.   Tear three pieces of white card to look like snowy mountains/hills and fix to the bottom of the card you have just coloured and set the setting sun down behind the mountains. 

Next using black card, stamp the 'Snow on Snow' stamp onto it using a Versamark pad and heat emboss using white powder.   Cut out the centre picture with a craft knife, leaving the border only.   Fix the border over the snowy mountains using sticky foam pads.

 
Stamp the deer using black ink onto some white card slightly coloured with the same inks that you used for the sky.   Cut out the stag only and fix him to the snowy scene, leaving a little sky colour around hs ears and antlers.

Punch out one large snowflake and seven small ones and fix to the card front.   Add adhesive topaz gemstones to the centres of the top left and bottom right snowflakes.    Lastly fix the snowy scene with the border to the card front.    Well thats another card  finished.   Hope you've been inspired by my card and give it a go! you still have time before Christmas.    Until my next post, be good and above all, be happy !
I'll be back soon with another card, hope you will be too and if you would like to leave me a comment, I would be delighted.

                                                           Big Hugs     Jennifer   xx


Monday 9 December 2013

Wishing You Joy and Peace at Christmas

Good afternoon my lovely Followers, Crafty Friends and Visitors,

Hope everyone is fit and well at the beginning of another new week   The older I get, the faster they seem to go lols !!!   they should be slowing down as I get older, not speeding up lols!!.   Well an early blog from me today.   Housework all done, lunch over and no distractions, so onto today's card.  This card was made for Sue and Harvey of Imagination Crafts in June 2012 ready for the Christmas shows, hope you like it.


Now this is one of my favourite Christmas stamps,  I know, I have lots of favourites lols !   but it is such a lovely dove isn't it?   I chose not to use the traditional colours for this project but to use pastel shades and if I say so myself, it has worked quite well.  I hope you think so too.   Ok off we go, let's get started shall we?

Make a base card from pink card stock.   Matt some navy card onto the pink, leaving a small border of pink showing.   Take a piece of white card again slightly smaller than the navy and stamp the words 'Joy'  and 'Peace' plus the olive branch, using the Versamark pad, around the edges of the white card.   Then heat emboss using silver embossing powder.   Fix this to the navy card.

Take another piece of white card and stamp the main image of the dove onto it using the Versamark pad and heat emboss with white embossing powder.   Using a paintbrush,  a little water and the Chalkies,  colour over the white embossing.   Stamp 'Love' onto the top of the dove image with the Versamark pad and heat emboss with silver powder.   Cut out the stamped image and matt onto some silver mirror card, then matt onto some navy card, leaving small borders each time.


Take more white card and stamp the image a further four times, again using the Versamark pad and heat emboss with silver powder.   Cut out and 3D the dove and the branch and fix to the original image with silicone glue.   Do the same with the small image of the dove but do not 3D this.   Fix it to the top of the main image with a sticky foam pad.   Add four square holographic  mosaics to the white border.  Well that's all folks, card is finished.   Must go now, have to meet my beautiful Grandson from the school bus.    Take good care of yourselves until my next blog.    Remember! crafting is fun, so.....have some fun !

                                                                Love and rainbows,

                                                                  Hugs  Jennifer xx

Friday 6 December 2013

The Clearing.

Hi there Followers,  Crafty Friends and Visitors,

First of all I would just like to say welcome to my new followers Linda and Pauline and the existing ones too of course.   It is nice to know there are many enthusiastic,  like minded people out there who just like to make cards and enjoy doing it too.   It is a great hobby.   I hope  I may  inspire you in some small way.

Hope you've all had a good week and are looking forward to the weekend.    I understand from the weathermen that the weather is going to be so much calmer over the weekend, thank goodness.  Boy it was so....windy yesterday.  We have had a few flakes of snow today but nothing to write home about.

Tonight's card I made for Sue and Harvey of Imagination Craft's and   I have used one of their many beautiful  Stamp Sets called  'The Clearing.'    Not sure if this stamp set is still available but it was one of my favourites back in September 2011.


Take some white card and make a card landscape style.   Onto this matt some black card leaving a border of white showing.   Onto this matt some rainbow coloured paper   Cut two squares of black card and cut each one in half diagonally, creating four triangles and put these aside until later.

Cut out a large circle using the Nellie's multi frame die.   Onto this, stamp the stag with Versamark and dust over with the gold mica powder.  Swipe the Versamark gently over one edge of the circle and again, dust with gold mica powder.   Glue this circle onto some rainbow paper and trim away excess and put this aside for the moment.

Dust some black card  with Versamark and mica powder.   Using the Nellie's  die set cut out the largest oblong.   Turn over the cut- out oblong so the black side is facing you and stamp the tree using the Versamark pad and dust with gold mica powder.   Take the left over negative after cutting out the oblong and glue this to the base card with the gold mica side facing towards you.   Next glue the oblong inside this with the black, stamped side facing you.

Cut a piece of acetate to fit over the rainbow paper and onto this stamp the Christmas Greeting, the snow and the stag using the black Stazon pad.   Lay this over the base card and fix with glue in each corner.   Next glue the four small black triangles in each corner (covering up the glue)

Glue the circle on top of the acetate with the gold edge overlapping the black oblong.   Cut out a flower from the left-over black card with mica on it,  do the same with the flourish and glue these to the base card.   Cut out a further flower from some pink patterned paper and glue to the centre of the flower.   Add some Glitz Gel to the flower.

Punch out some black and gold circles from the left-over card and glue a few onto the acetate beside the stag.   Phew!!   well you now have a finished card.   This does take a little time to make but I think the end result is worth the time  and patience.   I do hope you think so too.  Until my next blog, take care and have a lovely weekend.

                                                                 Love and rainbows,

                                                                    Hugs  Jennifer xx


Tuesday 3 December 2013

A Snowman get together.

Hi there my lovely Followers, Friends and Visitors,

Hope your week is going well.   I wonder if we will have a white Christmas this year?  Wet and very windy seems to be the way this week will end!!    As long as the white stuff stays away a little longer.   Here is the card we are going to make tonight.


Cut out and fold white card using the stepper template.Cover the three small steps with Christmas paper - Papermania 'Home for Christmas'.   Cover the larger step with more Christmas paper.

Punch out a piece of the red paper using the Martha Stewart 'Rings' punch into a narrow strip.   Glue this to the right-hand edge of the card.

Tear four pieces of white card to look like snow and glue to the steps on the card.   Punch out one large white snowflake using the Woodware punch and add to the top left of the large step, using sticky foam pads.   Punch another white snowflake but rub this one over the Versamark pad and heat emboss using the Claret embossing powder.   Fix this one in the same way to the top left of the back step of the card.

Stamp the snowman four times onto white card and heat emboss with the Claret embossing powder.   Cut them out and fix them to the card front using sticky foam pads.

 
Next take some white paper and the stencil and trace around the tree.   Cut the tree out and rub over the Versamark pad and heat emboss using the Claret embossing powder.   Fix this to the card front with Imagination Craft's Magi-Bond Glue.


Punch out five small white snowflakes and attach to the card front using sticky foam pads.   Punch out a two inch white circle and stamp 'Happy Christmas' and some snowflakes onto it using the Versamark pad and heat emboss with the Claret embossing powder.   Fix this circle to the top right of the card using sticky foam pads.   Well that's it folks, finished.  Hope you like it.   Thank you so much for visiting my blog and I hope I may have inspired you a little with my card.   Until next time I blog, be happy, stay warm and safe.

                                                               Love and Rainbows,

                                                                 Hugs   Jennifer xx


Saturday 30 November 2013

Rainbow Snowflakes.

Hello all my Crafty followers, Friends and Visitors,

How is your weekend going so far ?  good I hope.   The weather hasn't been too bad thank goodness but according to the weather men, we are in for some wintry weather at the end of next week, so get all your outside jobs done before then lols!!!   Well onto tonight's card.   This card I made in September 2012 for Sue and Harvey of Imagination Craft's and uses two of their many lovely Christmas stencils - the Snowflake Frenzy Background. and the Snowflake Embossable.   I also used the Chalkies - Sugared Almond Set and the Citrus Fresh Set.   These are fabulous to use and there are so many different  shades to choose from..  They give a chalky, matt finish which looks great.   OK enough waffling from me lols !!! let's get started shall we ?   Here is a picture of the card we are now going to make.

                       
Make a base card from cream cardstock and onto this matt some navy card, leaving a narrow border of cream card showing.

Take another piece of cream card and lay the Snowflake Frenzy Stencil over it and dab the Chalkies through the stencil design.   Remove the stencil.   When dry, lay the smaller Snowflakes Embossable over the card and spread the Diamond Sparkle Medium over it.   Remove stencil and whilst the Sparkle Medium is still wet, sprinkle some bright pink glitter over it.   When dry, cut out a semi-circle from the top left of the card.   Fix this to the base card using double sided sticky tape.

Using  a die cutting machine and cream card, cut out and emboss the large Spellbinder's snowflake and colour with the blue distress ink.   Stamp some small snowflakes around the edge using the blue distress ink.  Fix this to the top left of the base card.   Cut out and emboss the smaller snowflake using navy card.   Glue the navy snowflake to the centre of the larger white snowflake and add a gem to the centre.   

Cut out some snowflakes from the spare card, left over after cutting out the semi-circle (waste not, want not lols !!).   Glue these around the large snowflake.

Cut out and emboss a small scalloped circle from cream card, using a Sizzix Die and colour using the blue distress ink.   Stamp 'Warm Winter Wishes' onto the centre with the same ink pad and add some snowflakes around the edge.

Cut out a larger navy circle and glue the stamped circle to the navy circle.   Matt this onto another slightly larger cream, scalloped circle.   Add a pink bow and gem and glue to the bottom right of the base card.   There we are - all finished !!!      Hope you all like it.   Thank you all so....much for visiting my blog.   Until next time - have a good week and happy crafting.   See you all soon.

                                                                 Love and rainbows,  

                                                                    Hugs   Jennifer xx                            


Wednesday 27 November 2013

Beautiful Butterflies.

Good evening Crafty Friends, Followers and Visitors,

How are you all?  good I hope and your week is going well  so far.     I would just like to say welcome to my new follower, Fiona and to all my older followers thank you for visiting my blog and for all your lovely comments, they really mean a great deal to me, thank you.

The card I would like to share tonight, I made in Dec 2012 for the QVC show in January 2012.  It is made using Imagination Craft's beautiful Butterfly and the Gerbera Stencils and of course my favourite product - Sparkle Medium lols!!   Well let's begin shall we?

Make a base card from lemon card.   Matt the lilac shiny card onto this leaving a narrow border showing.   Take a piece of the butterfly background card and lay the butterfly stencil onto it and spread the Sparkle Mediums over it using the spatula.   When dry, matt this onto the lilac card.

Lay the butterfly stencil onto some acetate and spread the Sparkle Medium over it.   Remove stencil, leave image to dry.   When dry,  cut the butterflies out and fix to the butterfly images on the base card, glueing down the centre of the butterflies.   Bend up the wings slightly.

   
Lay the Gerbera Stencil over some white card and spread the Amethyst Sparkle Medium over the flower heads and Hunter Green over the leaves and the stems.   Remove the stencil and leave image to dry.   When dry, carefully cut out the Gerberas and glue one to the bottom left and the other to the top right.

Cut out the corner die using a die cutting machine and some amethyst coloured card.   Cut the die cut in half and add one scroll to each gerbera.

Punch out fifteen tiny circles from amethyst card and glue in groups of three to the card front.   Cut out a small square of lemon card and cut in half diagonally.   Cut a slight curve in each and glue one to the top left and another to the bottom right corners.   Cut out two squares left over after punching out the small circles and glue one to each of the pieces of lemon card you have glued to the corners.   Well, that is it finished.   Hope you like this one.

Have a good week and until my next blog, take care.

                                                                 Love and rainbows,

                                                                   Hugs  Jennifer xx

Sunday 24 November 2013

Time and Motion

Good evening all,   hope you have all had a good weekend.  I thought I would do an early post tonight.   I would like to share a card I made a few days ago and it uses Imagination Craft's 'Time and Motion' Stencil which was designed by Kath Mucky Paws Halstead.  I really like this stencil.   I chose to make this card using blue, lilac and purple colours.   Hope you like it.  Well we'll get started shall we?

    
Make a base card from the blue cardstock.   Matt a piece of lavender card onto the blue, leaving a small border of blue showing.   Next cut a piece of blue card, smaller than the lavender and using the stencil, put through an embossing machine.   Emboss the left-hand side of the card only.   Put aside for the moment.

   
Take some white card and colour it using distress inks.   Lay the stencil on top of the card and spread the sparkle mediums over the stencil, remove stencil and leave the image to dry.   Using some circle dies, cut out four circles from the stencilled card.   Take a piece of blue card and lay the stencil onto it with one of the clock faces over the card and spread the  amethyst sparkle medium over it.   When dry, cut out the clock face and layer up all the circles onto the embossed blue card  which you put aside earlier, until you are satisfied with the way your card looks.    Die-cut the smallest circle with two slits in it and thread the ribbon through it.   Fix the ribbon down the right-hand side of the blue card..   Next fix the blue card with the circles on, to the base card.

  
Lastly, add a metal pointer to the small circle fixed to the ribbon and cut out a small amethyst circle from the left-over card, after spreading the sparkle medium and glue it to the rest of the circles.   Well that's it for now folks.   Have a good week   and take care of yourselves until my next post.    Thanks for visiting my blog and thank you for your lovely comments.

                                                                    Love and rainbows,

                                                                       Hugs  Jennifer xx.


Thursday 21 November 2013

A reminder of Springtime to come.

Good afternoon everyone,

An early post from me today for a change !   Hope all is well with you and yours and you are managing to keep snug and warm.  The weather here today is damp and dreary, with the odd flake of snow in amongst the rain.  To cheer us all up I thought I would share a card which reminds us of what is to come in the Spring of new year.  This card was made using an Imagination Craft's a  stamp, Crocus and was made in December 2011.   I have also used some Silkies and Sparkle Medium.  Let's get started shall we ?

Make a base card from some buff coloured card and onto this, matt a piece of brown, leaving a small border of the buff card showing.

Take a piece of white card and colour it with the Royal Satin Silky and edge with a small amount of the Purple Lace.   When dry, lay the stencil on top of the now blue card and dab the Royal Satin through it.   Carefully remove the stencil and let it dry.


Next lay the stencil in exactly the same place again and using the spatula, spread some of the Gold Shine Sparkle Medium through the stencil on the bottom right corner only, and leave to dry.


Punch each corner using the 'Rings' corner punch by Martha Stewart.   Fix this panel to the brown card using double s,s.tape.   Stamp the crocus stamp onto some white card and heat emboss using gold embossing powder.
  
Colour the image using a paint brush and the Silkies.   Cut out the crocuses leaving a tiny white border showing,   glue this to a square of brown card, again leaving a small border showing.


Add a blue ribbon bow to the top left of the card and  there we are that is this card finished.   A fairly quick card to make.   I do hope this cheerful card has lifted everyone's spirits with the thought of 'Spring is just around the corner.'    Take good care of yourselves.   Until I blog again.   See you soon and thanks for stopping by.

                                                                 Love and rainbows,

                                                                Big Hugs   Jennifer xxx

Monday 18 November 2013

Sweet Music and Lilies

Good afternoon everyone, how are you all ?  well and happy I hope but maybe a little cold.  It is very cold here today, maybe snow is on its way, I do hope not lols.  A night by the television and the log fire is on the cards for us tonight, snug and warm.

Today's card is a reminder of the warmer weather we had earlier this year, although it now seems a long time ago lols.  I made this card using one of Imagination Craft's decoupage stamps, Lilies which I think is very pretty.   I decided not to decoupage this one and just did a stamped card.   I hope you think it looks ok,   I was quite pleased with the result, even if I say so myself !   OK let's  begin.   Below is a picture of the card we are going to make today.

  
Make a base card from cream cardstock.   Cut a piece of green card slightly smaller than the cream card and punch all four corners using the EK Success Corner Punch.   Matt this onto the cream base card using d.s.s.tape.   Cut another piece of cream card smaller than the green and again, punch all four corners with the corner punch.
Take a piece of white card snaller than the cream and colour it using Distress Inks and blending tool by Ranger.   Onto the centre of this card, stamp the main image of the lilies using a Versamark Pad and heat emboss using gold embossing powder and a heat gun

   
Colour with mica powders and brush using water.   Stamp around the edges of the stamped design using the swirl stamp from the set, using the Green Encore Metallic Stamp Pad.

Fix this panel into the corners of the cream card and fix to the base card.   That's it finished folks, hope you like this one.   Take care of yourselves until I blog again.   Thank you for visiting.

                                                                Love and Rainbows,

                                                                  Hugs Jennifer xx


Saturday 16 November 2013

Pink Flourishes

Good evening all,

Hope you have had a good weekend and are ready for another week.  The weather here has been quite damp, dull and dreary.   Here,  there is talk of snow coming this coming week!  not too much I hope!   The older I get the less I like the snow, it can be so disruptive.

For tonight's card I have decided to give Christmas cards a rest and I would like to share a card I made for Imagination Craft.s in April 2013.   It uses their very pretty  Petal Flourish Stencil and their Blush Satin Silkie  from the Tropical Paradise set.    Below is the card we are going to make.


Make a base card from black shiny card.   Take some pink satin card cut slightly smaller than the black and glue the gold border die-cut down the left-hand side of the card.   Fix some pink ribbon across the centre of the card and secure on the reverse.   Glue this pink card onto the black base card.   Cut out and emboss the scalloped oblong from gold card.   Matt this onto the pink card.

Cut out and emboss the smaller scalloped oblong from white card.   Cover this with the stencil.   Mix some  sparkle medium with the blush satin silkie and spread over the stencil.   Remove the stencil and leave image to dry but before it does, sprinkle some gold glitter over it and knock off the excess.

Matt this onto a piece of black card and then onto the gold scalloped oblong.   Colour around the edges of the white scalloped oblong with spun lipstick distress ink. Glue the oblong to the right-hand side of the base card and add a ribbon bow to the right-hand side of the ribbon.

Well this card is finished now, hope you like it.  Thank you for visiting my blog and for the lovely comments you leave.  I read and reply to every one.   Until my next post, take care of yourselves.

                                                                Love and rainbows,

                                                                  Hugs Jennifer xx


Wednesday 13 November 2013

Woodland Delight

Hi all,

How are you today?  well I hope.  Very cold and windy here today, rain this evening.  It could be a lot worse I suppose,  like snow which may not be far away!!!   this time last year we had about four inches of snow, brrrr... makes me feel cold just talking about it.   I think we'll change the subject lolls !!!

Today I would like to share one of my favourite cards made with one of my most favourite stamps.   The stamp was an Imagination Craft's Stamp, not sure if it is still available though, if not there may be a similar stamp out there in the craft world you could use.  I made this card in October 2010.   Here we go then !

     
Make a base card from navy blue card and onto this matt a piece of white card.   Next matt another piece of navy card onto the white leaving a half inch border of the white showing.   Take a piece of white card, slightly smaller than the navy and colour with the Inkadinks (not too much of the lilac ) !   When dry, roll the Retro Star roller over the Stazon Midnight Blue Inkpad then roll across the centre of the now coloured card.  When dry, dab some silver pigment ink over the top but do not cover over all the blue.   Heat emboss using silver embossing powder.

Stamp the deer using the Stazon inkpad, onto a piece of vellum.  Die-cut a white border using a Spellbinders Nestability.   Glue the border to the vellum and trim away any excess vellum.   Fix this to the centre of the coloured card, then fix the coloured card to the centre of the base card.
  
    
Take the inch square Stampboard and colour it in the same way you coloured the blue/silver background card.   Stamp the stag's head only onto it using the Midnight Blue Stazon pad.   Glue this in position over the original stamped image using Magi-Bond Glue.

Add two square holographic  rhinestones to the top left and two to the bottom right of the base card.
Well that's it finished folks.  The vellum square gives almost a misty look which makes it stand out from the background,  hope you like it.  I'll be back again soon.   Until then, I hope what's left of the week turns out well for you.   I love to hear what you think, thank you for taking the time to visit my blog, it's much appreciated.

                                                                 Love and rainbows

                                                                   Hugs Jennifer xx

Sunday 10 November 2013

Winter Trees

Good evening all,

Hope you have all had a good weekend and are ready for another week.  The weather here has been very cold but bright and sunny, the snow covered hills look spectacular.   Tonight I would like to share another Christmas card with you which I made for Sur and Harvey of Imagination Crafts in June 2012.

  
Make a base card from the duck egg blue card.  Matt some purple card onto the blue, leaving a small border showing..   Take a piece of white card slightly smaller than the purple card and using the circle die,  cut out an aperture from the centre of the white card..

Using the Dusty Concord Distress Ink,  stamp the tree around the edge of the cut out circle.   Stamp the snow dots between each tree using the distress ink.   Colour in the trees with Promarker pens.

Take another piece of the blue card and stamp 'Seasons Greetings' from the stamp set onto it along with some dots of snow, from the stamp set.    Fix this behind the aperture on the white card.  

Stamp the main trees image onto some white card using the distress ink a total of four times.   Colour them with Promarker pens  and cut out and 3D them using silicone glue.   Fix the trees to the bottom of the aperture.

Fix the white card with the blue aperture and the 3D trees, onto the purple card.   Glue a bow to the top left of the aperture with Magi-Bond Glue.

Punch out a small white circle for each tree around the aperture and glue in position with the Magi-Bond Glue.

Well that's all for now, have a good week.  I'll be back soon with another card, hope you will too.   Until then take care of yourselves.

                                                                    Love and rainbows

                                                                      Hugs  Jennifer xx


Wednesday 6 November 2013

By the Light of the Silvery Moon.

Good evening all,

An earlier post from me this evening for a change lol!   Had a busy day today, no crafting at all today.   Had guests for a birthday celebration so most of the day was taken up preparing for the birthday tea.   A most enjoyable afternoon was had by all.   Well tonight's card features one of my most favourite Imagination Craft's stamps and was made in August 2011.   I just love this stamp and I could go on designing card after card with it lols.   It is from The Stencil Stamp Range called  ' The Clearing'.   Right, shall we get started?


Glue some grey paper onto a piece of black card, leaving a small border of black card showing.   Stamp the tree three times onto the grey paper using black ink, twice on the left side and once on the right-hand side.

Tear three pieces of white card to look like snow drifts and fix ti the bottom half of the grey paper, fixing down the sides and the bottom edges only.   Matt the black card with the grey paper and snow onto a white base card - A5 landscape style.   Stamp another tree in black ink onto a spare piece of white card.   Cut out the tree and glue to the card front.   Next, stamp the tree twice more onto black card but this time, stamp them using the silver pad and heat emboss using silver embossing powder.   Cut them both out and add to the card front.   On white card punch out a one inch circle using the circle punch,  rub the silver  ink pad over part of the moon and heat emboss with silver embossing powder.   Use the black ink pad to colour any white parts of the moon.   Attach to the sky using sticky foam pads.   Using the white pen, dot some snow on the sky.


Stamp the stag on some spare white card using the black ink pad and cut him out.   Fix to the card front.   Colour his antlers etc., where the moonlight  shines on him, with white pen.   Fix some mesh down the left-hand side of the base card with some Magi-Bond Glue.

Cut two squares of white card and stamp the word 'silent' on one and 'night' on the other.   Matt these onto some black card leaving a tiny border of black showing.   Fix these squares on top of the mesh, halfway down the left side of the card using stcky foam pads in a diamond shape   .Stamp ' Christmas Greetings' on the bottom of the card using a black ink pad.

Add a silver ribbon bow, and there we have it, one finished Christmas card,   hope you like it.   I will be back again soon.   Thank you so much for visiting my blog,  and for all your lovely comments.  I love to read them and hear what you think of my creations.  

                                                                 Love and rainbows,
                                                          Take care until my next post.
                                                                  Hugs Jennifer xx


Monday 4 November 2013

Christmas Roses

Good evening all ,

I'm a little earlier with my blog tonight,  well it's quite late now but at least it isn't midnight as usual lols!!!  Hope you are all having a good week.   I have been doing some Christmas shopping today, bought a couple of presents, some cards and some wrapping paper.  I don't like leaving my shopping until the last minute like  some people do !!   some find that quite exciting but I would find that stressful lol !!.    Well enough chit chat for now.   I would like to share a Christmas card with you tonight, which  I made  using an Imagination Craft's decoupage stamp  in July of last year   hope you like it.

Make a base card from red card.   Take some white card slightly smaller than the red and stamp the mistletoe spray, from the stamp set, around all four edges of the white card, using the Versamark pad and heat emboss using the green embossing powder.   Matt this onto the red card.

      
Matt a piece of green shiny card, slightly smaller than the white and matt onto the white card.   Using the Spellbinder's Grand Labels One and a die cutting machine, cut out the shape from white shiny card (the reverse of a piece of green shiny card)  and emboss using the Swirls Embossable.   Rub the Versamark over the embossed card and brush with mica powder, then with a green inkpad.   Matt this onto the  green shiny card.

Take some white card and stamp the main flower image a total of six times, using the Versamark pad and heat emboss using the green embossing powder.   Colour with the mica powders, brush and water.   Cut out and 3D, using silicone glue.   Cut out around the swirls of the main image.

Using white shiny card, cut out and emboss the X Cut Ornate Frame Die using a die cutting machine.   Matt this onto some green shiny card and then matt this onto the white embossed swirl card.   Fix the main 3D image onto the white die cut using sticky foam pads.

Lastly, add a red ribbon bow to the top left of the base card and add four gold peel-offs to the points of the main die cut.   Phew !!!  that's it folks, hope my card has inspired you to get out those stamps and get making some Christmas cards lols.

Take care of yourselves until I return with another card.  Thank you so much for taking the time to visit and I do love to read your comments,   I will try to answer them all.

                                                               Love and rainbows,

                                                                Hugs   Jennifer xx